Thursday, 27 October 2022

how to create a word list In kali Linux

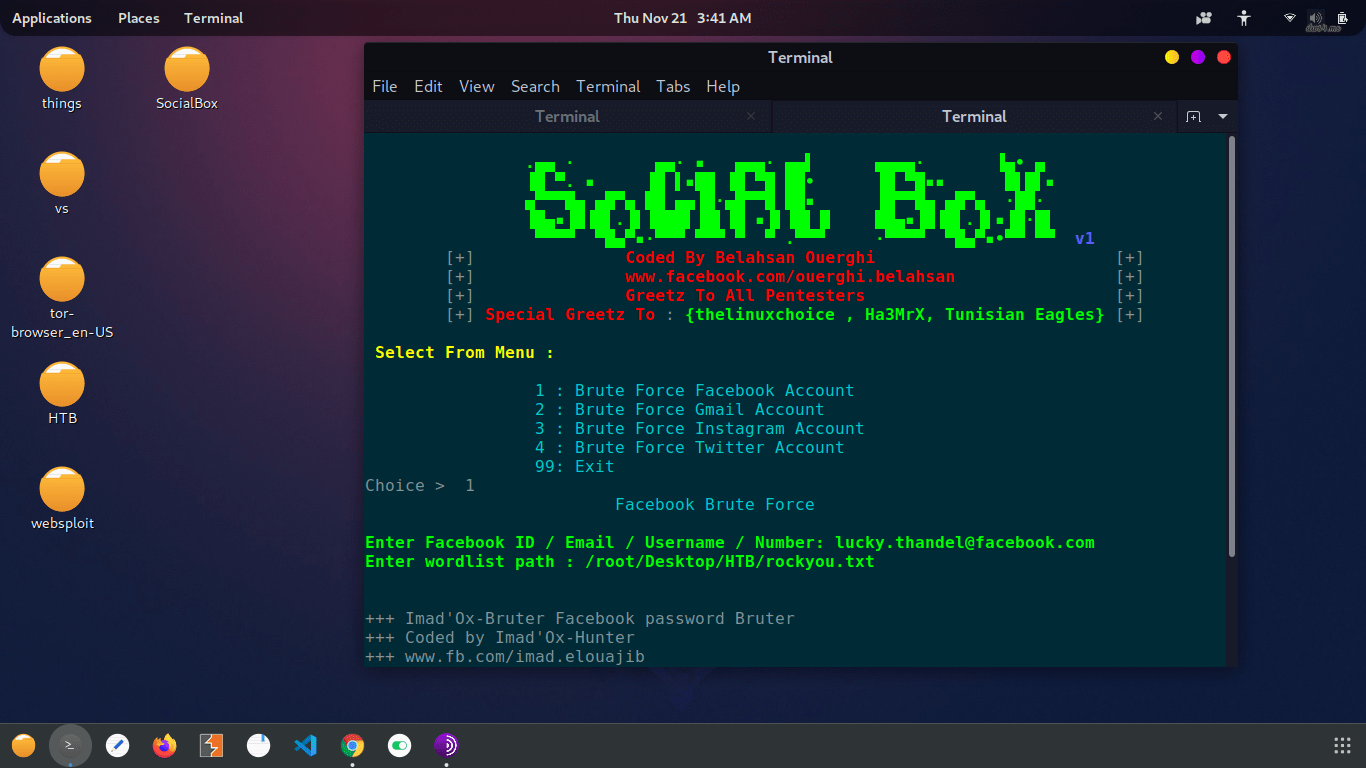
 wordlist is just a list of words that aircrack-ng is going to go through, and trying each one against the handshake until it successfully determines the WPA key. If the wordlist is better, the chances of cracking the WPA key will be higher. If the password is not in our wordlist file, we will not be able to determine the WPA key.

To create the wordlist, we're going to use a tool called crunch. The syntax is as follows:

  1. crunch [min] [max] [characters] -o [FileName]  
  2.   or   
  3. crunch [min] [max] [characters] -t [pattern] -o [FileName]  

where

  • crunch is the name of the tool.
  • [min] specifies the minimum number of characters for the password to be generated.
  • [max] specifies the maximum number of characters for the password.
  • characters specify the characters that we want to use in the password. For example, you can put all lowercase characters, all uppercase characters, numbers, and symbols.
  • -t is optional. It specifies the pattern.
  • -o option specifies the filename where the passwords are going to be stored.

If we know the part of the password, -t option is very useful. For example: if we're trying to guess the password of someone and we have seen him typing the password, we know that the password starts with a and end with b. Now we can use the pattern option and tell crunch to create passwords that always start with a and end with b and put all possible combinations of the characters that we put in the command.

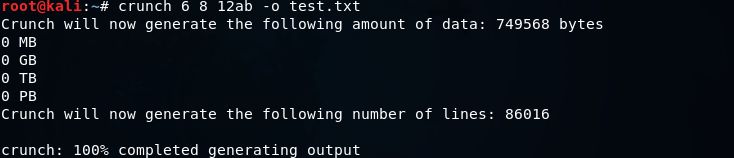
We're going to use crunch, and then we're going to make a minimum of 6 and maximum of 8. We're going to put 12ab, and store it in test.txt. The crunch is going to create a combination of passwords (minimum of 6 characters and maximum of 8 characters), and it's going to create all possible combination of 12ab. It's going to store all the combination in a file called test.txt. The command will be as follows:

Creating a Wordlist

The following output will be shown after executing the above command:

Creating a Wordlist

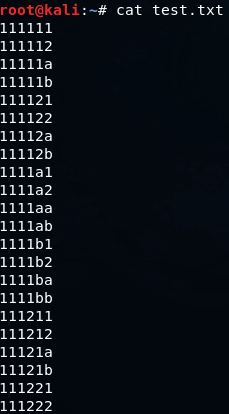
Using cat test.txt command, we can see all of the passwords that are stored in the file test.txt. The following screenshot shows all the passwords:

Creating a Wordlist

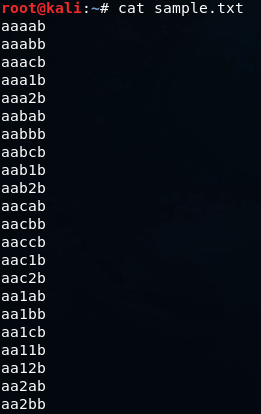
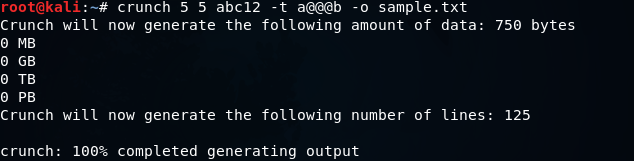
Now let's take a look at the pattern option. We will go to crunch, using a minimum of 5 and maximum of 5, so all password will be five characters long. Then we will put the characters, which are abc12 and we will add the -t option, which is the pattern option, then we will put a@@@b that means the password starts with an a and end with b. Through this, we will get all possible combination of characters between a and b. Then, we are going to specify the output file -o, let's call it sample.txt. The command will be as follows:

Creating a Wordlist

The output will be as follows:

Creating a Wordlist

It creates 125 passwords. Now let's take a look at them. In the following screenshot, we can see that they always start with an a and always end with b.

Creating a Wordlist


How to Bypass Cloudflare on a Vulnerable Website | Wafw00f tool

 ATTACK

This process is going to be short and simple. let’s move on Wafw00f tool first. it is a tool that can tell if the given website is protected by some firewall or not. for example, we have a website “https://gchq.github.io/CyberChef/”. it is a very useful website for CTFrs. it is useful in many ways. but let’s just keep it apart. we will discuss it some other day.

So, if we want to check if the website has some kind of firewall or something, we will use Wafw00f tool:

Type this command:

wafw00f https://gchq.github.io/CyberChef/

The website has Fastly (Fastly CDN) WAF. you can know more about this WAF from HERE.

Screenshot:


Well, sometimes it doesn’t work with the domain. if you see no result with domain then use the IP of the domain.

You can get IP of a domain with dig command:

dig gchq.github.io

Screenshot:

then the command would be :

wafw00f 185.199.111.153

Screenshot:


look at the output, it says “Fastly (Fastly CDN) WAF”  as before.

But the tutorial is to bypass the WAF not only to show you the WAF name. well, there are two methods whereby we can bypass WAF.

 # Method 1.

I knew this method already. and it works very well in some cases. for example, we have a website “example.in” which is protected by Cloudflare. now, we need to see it’s IP. you can use dig or Nmap.

Type this command to see the IP of a website:

dig example.in

After that, type the IP in the URL instead of the domain. if you are allowed to visit the website with its IP then congratulations because you just bypassed the WAF on the site. but if you some error like ” Direct IP is not allowed”.

 # Method 2.

This Method is a little different from the first one. in this method, if you are getting the “Direct IP is not Allowed” error. then there is a little chance that we can solve it. actually I don’t know if it works or not. because it was told to me by my friend. but I think there is nothing wrong to try.

To solve this, we can add the host to the /etc/hosts file.

Type this command to edit the /etc/hosts.

nano /etc/hosts

Screenshot:

And that’s it. you can visit the website with IP again and see if it works.


Stay home, stay safe and keep reading our articles.

Thursday, 29 September 2022

UNBLOCK YOURSELF ON WHATSAPP EASILY 2022


WHAT WILL YOU LEARN:- IF SOMEONE BLOCKS YOU WHATSAPP THEN, HOW CAN WE UNBLOCK OURSELF.

SO LET US GET STARTED

Step 1: Write down your blocker’s phone
number
If you’ve got the contact that blocked you saved
on your phone, write it down somewhere and
delete it from your phone.

Step 2: Back up your chats
I believe you already skill to copy your
WhatsApp chat (both messages and media files).

Then

Tap Copy to Google Drive and found out the
backup frequency to your liking.

How to restore WhatsApp messages when you get a new phone AND a ...

You will be prompted to select a Google
account that you simply will copy your chat history
to. If you are not having a Google account, tap Add
account when prompted. Please remember the
Google account you are using for the backup.

Tap copy over to settle on the network you
wish to use for backup. Please note that backing
up over cellular may result in additional data
charges.

Step 3: Delete your WhatsApp account. Go to account settings on your WhatsApp and delete your account.

By deleting your number, it means you are no
longer active on WhatsApp so technically, you
cannot block someone who’s not on WhatsApp.
Whoever blocks you’ll not have you ever on
the blocked list.

Step 4: Clear WhatsApp data
Now attend your phone settings > app >
WhatsApp and clear the data.

Step 5: Reactivate WhatsApp
Open your WhatsApp and register your
number on the WhatsApp platform. This time,
you are registering for the first time over again.

Step 6: Restore Chats
Restore your chat back up.

Make sure the same Google account that
was used to perform the backup has been added
to your phone.

After verifying your number, you will be
prompted to restore your messages and media
from Google Drive.

After the restoration process is complete,
tap Next and your chats are going to be displayed once
initialization is complete.

After restoring your chats, WhatsApp will
begin restoring your media files.

NOTE: you would like to revive from the backup on
your google drive but if you didn’t do this
WhatsApp will automatically restore the backup
from your local storage memory which could be
SDcard or phone internal memory as the case
maybe.

Step 7: Re-add contact
Lastly, save the contact you wrote down earlier
back on your phone. Now look for the person/
contact that blocked you within the first place and
send a message.

Wednesday, 28 September 2022

How To Perform Brute-Force on Facebook Easily


Installation

type this command to download Social-box:

git clone https://github.com/TunisianEagles/SocialBox.git

now, go to the downloaded dir and type this command:

chmod +x install-sb.sh
chmod +x SocialBox.sh

these commands will give these files executable permissions.

now run the install-sb.sh:

bash install-sb.sh

now that you have the tool ready, we can hack a facebook account.


Attack

First of all, we need a facebook account. you can try it on your facebook account or you can create another one.

now we will run the Socialbox:

bash SocialBox.sh

it will check its installation and this can take a while.

after that, the tool we show you some options. we will type 1 for facebook.

now, it will ask for the facebook account (Facebook ID / Email / Username / Number). you will have to enter one of those values.

after that, you will have to provide a wordlist path. as you hit ENTER after this, it starts the attack.

this process can take your whole life to find a password. so, I would suggest using a  custom wordlist. generate a wordlist with your own characters.


Thanks For Visiting

How To Get An INVITE code from HTB(hack the box)

 how to get an invite code from HTB?

warning- spoilers ahead if you wanna hack it yourself don’t go down.

you might be on this page  https://www.hackthebox.eu/invite and wondering that how will you get an invite code? as you can see that there is something written over input.

like this:

it means, we have to hack the website to get the code:

step 1

go to the inspect elements by pressing CTRL+SHIFT+I. you can see js/inviteapi.min.js parameter that seems interesting.

step 2

go to the https://www.hackthebox.eu/js/inviteapi.min.js and look if there is anything to do with. you will see that there is makeInviteCode. we will use it in invite page console.

step 3

go back to invite page and open inspect elements and go to the console and just write makeInviteCode there and hit ENTER. you will see some kinda encoded code.

step 4

it is base64 encoded. go to https://www.base64decode.org/

and decode it easily. it will give you some parameter that will give you invite code.

step 5

you can’t get anything by make get a request to https://www.hackthebox.eu/api/invite/generate. so we will make a post request using curl.

type this command in your terminal

curl -XPOST <https://www.hackthebox.eu/api/invite/generate>

and you will get the invite code. but remember, a particular invite-code will work only for a particular IP. so you won’t be able to use anyone’s code.


thanks for visiting

Friday, 23 September 2022

Ethical Hacking - What is Reconnaissance

 Information Gathering and getting to know the target systems is the first process in ethical hacking. Reconnaissance is a set of processes and techniques (Footprinting, Scanning & Enumeration) used to covertly discover and collect information about a target system.

During reconnaissance, an ethical hacker attempts to gather as much information about a target system as possible, following the seven steps listed below −

  • Gather initial information
  • Determine the network range
  • Identify active machines
  • Discover open ports and access points
  • Fingerprint the operating system
  • Uncover services on ports
  • Map the network

We will discuss in detail all these steps in the subsequent chapters of this tutorial. Reconnaissance takes place in two parts − Active Reconnaissance and Passive Reconnaissance.

Active Reconnaissance

In this process, you will directly interact with the computer system to gain information. This information can be relevant and accurate. But there is a risk of getting detected if you are planning active reconnaissance without permission. If you are detected, then system admin can take severe action against you and trail your subsequent activities.

Passive Reconnaissance

In this process, you will not be directly connected to a computer system. This process is used to gather essential information without ever interacting with the target systems.

Thursday, 22 September 2022

Software Development Life Cycle (SDLC)

 A software life cycle model (also termed process model) is a pictorial and diagrammatic representation of the software life cycle. A life cycle model represents all the methods required to make a software product transit through its life cycle stages. It also captures the structure in which these methods are to be undertaken.

In other words, a life cycle model maps the various activities performed on a software product from its inception to retirement. Different life cycle models may plan the necessary development activities to phases in different ways. Thus, no element which life cycle model is followed, the essential activities are contained in all life cycle models though the action may be carried out in distinct orders in different life cycle models. During any life cycle stage, more than one activity may also be carried out.

The stages of SDLC are as follows:

Stage1: Planning and requirement analysis

Requirement Analysis is the most important and necessary stage in SDLC.

The senior members of the team perform it with inputs from all the stakeholders and domain experts or SMEs in the industry.

Planning for the quality assurance requirements and identifications of the risks associated with the projects is also done at this stage.

Business analyst and Project organizer set up a meeting with the client to gather all the data like what the customer wants to build, who will be the end user, what is the objective

Stage2: Defining Requirements

Once the requirement analysis is done, the next stage is to certainly represent and document the software requirements and get them accepted from the project stakeholders.

This is accomplished through "SRS"- Software Requirement Specification document which contains all the product requirements to be constructed and developed during the project life cycle.

Stage3: Designing the Software

The next phase is about to bring down all the knowledge of requirements, analysis, and design of the software project. This phase is the product of the last two, like inputs from the customer and requirement gathering.

Stage4: Developing the project

In this phase of SDLC, the actual development begins, and the programming is built. The implementation of design begins concerning writing code. Developers have to follow the coding guidelines described by their management and programming tools like compilers, interpreters, debuggers, etc. are used to develop and implement the code.

Stage5: Testing

After the code is generated, it is tested against the requirements to make sure that the products are solving the needs addressed and gathered during the requirements stage.

During this stage, unit testing, integration testing, system testing, acceptance testing are done.

Stage3: Designing the Software

The next phase is about to bring down all the knowledge of requirements, analysis, and design of the software project. This phase is the product of the last two, like inputs from the customer and requirement gathering.


Stage5: Testing

After the code is generated, it is tested against the requirements to make sure that the products are solving the needs addressed and gathered during the requirements stage.

Stage6: Deployment

Once the software is certified, and no bugs or errors are stated, then it is deployed.

Then based on the assessment, the software may be released as it is or with suggested enhancement in the object segment.

After the software is deployed, then its maintenance begins.

Stage7: Maintenance

Once when the client starts using the developed systems, then the real issues come up and requirements to be solved from time to time.

This procedure where the care is taken for the developed product is known as maintenance.